Protect Your Pool in 7 Steps: Installing an Inground Winter Cover
No one looks forward to installing their winter pool cover. But following this simple guide will help you get through the process in an organized, efficient way.
Before the Pool Cover Goes On…
You need to winterize your pool. This involves cleaning your pool thoroughly, balancing the water’s chemistry, disconnecting your pump, and lowering the water level below the skimmer’s mouth.
Your pool cover was designed to rest on the surface of the water so we recommend that you double check your pool for any leaks. You wouldn’t want to undo the hard work you’ve already done.
Some Things to Remember
Pool covers are made from very durable material, but sharp corners, rough edges, or hard surfaces can still pose a problem. Try padding these problem areas with old towels, foam, or similar materials from around the house.
Now that you’re ready to set up your pool cover, keep in mind that your goal is for it to fit snugly over your pool. Wind can damage your pool cover if it has enough space to get underneath the pool cover and cause it to billow or flap.
What You’ll Need:
- A pool cover
- Water bags (unfilled)
- Access to a hose
- Thin rope
- A friend to help out
Installing the Pool Cover
- Double check your pool area for any sharp, or abrasive materials that could damage your pool cover.
- Once the area is clear place the cover on the ground. With a partner start to unfurl the pool cover.
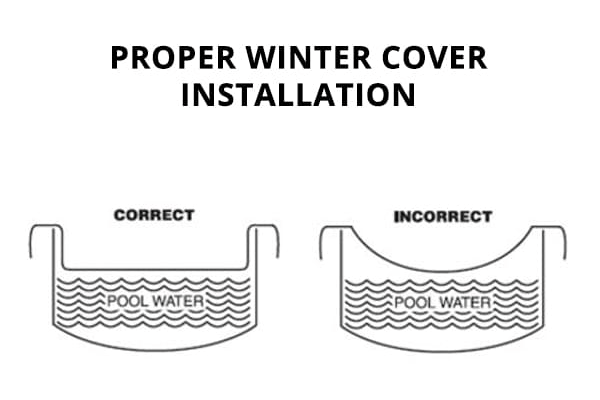
- Walk parallel to your partner from one end of the pool to the other. While doing this gently flap the cover, this prevents it from folding over on itself. Your pool cover was designed with about 5 feet of overlap to compensate for the lower water level and gives you room to weight it down (see diagram below for correct Winter Cover placement).
- If your pool cover has loops along the outside then slip the empty water bags through these loops. If not, just lay the water bags all around the cover’s edges.
- Be sure that the water bags are lying end to end around the entire perimeter of the cover. This will stop the wind from slipping under your pool cover.
- Move around the pool filling each of the water bags. Fill them 1/2 to 3/4 full to allow for any ice expansion.
- Lastly, you’ll want four smaller water bags, one for each corner of your pool. Fill these 1/2 to 3/4 full. Tie the rope around the smaller water bag and fix it to one of the larger bags. With one of these smaller bags at the corner of your pool you can be sure it will remain secure throughout the winter.

Once you have this routine down, closing your pool for the winter will feel more like a routine than a chore. But, to speed the process up even further, consider a winter safety cover – you won’t have to mess with water bags at all, and the cover will prevent pets or young children from falling into the pool.
Do you have any tips or tricks that you find useful in closing your pool? Share your experience with us!


